
I have always wanted to set two Christmas trees on each side of my front door as decoration for the holidays. In the five years we have lived in our house, this Christmas decorating plan has never come to fruition. Until now.
Quick backstory before I get into how to make the trees: When we first moved into our house, I purchased two Italian cypress trees and planted them in pots near the front door. They were over six feet tall and sooooo cool looking. I couldn’t wait to cover them with Christmas lights. But then one of the trees died. Before December. Waaaah! I didn’t want to waste more money on another tree to kill, so our door went treeless.
Then we had Lamborghini and I was too tired to decorate. The we had The Dot and I was too tired to decorate.
Enter 2018. I started working on the blog and wanted one of those cute Christmas porches that you see all over Instagram and Pinterest. I decided THIS year was going to be my year for decorating, and I was going to guarantee tree results by purchasing two pre-lit artificial Christmas trees. Because I’m on a self-imposed budget, however, my new plan to purchase two artificial trees wasn’t feasible.
So I’ve been racking my brain all month trying to come up with a way two make two large trees out of materials I already have around the house. I thought about layering magnolia leaves and even started collecting pine cones after seeing this beauty in the Grandin Road catalog. Then my mom visited last week and said, “It’s a shame you’re not in Rising Star because you could just use grapevines to make a tree.” Bingo.
My mom knows this, but I don’t need to go to Rising Star for grapevines. We live in the Piney Woods, and grapevines are everywhere. EVERYWHERE.
Grapevines and Peppervines in Texas
In east Texas, we’ve got two distinctive types of vines that are ideal for making wreaths and other woody decor (trees in this case): grapevines and peppervines.
You’ll notice the grapevines in late summer when the muscadine and mustang grapes start to ripen and fall from the trees. Although you can’t go and make cabernet sauvignon wine out of them, Texans have been making muscadine wine and jelly for a long, long time.
Peppervines are another abundant Texas vine (see this description in the Aggie Horticulture newsletter for more info). They are closely related to the grape family and similarly have a woody stalky vine. They also have colorful white, red, and dark-black berries that appear in early fall. A lot of people mistake peppervine for poison ivy because its leafs shoot out in clusters of three, but peppervine has several clusters of leafs that shoot out from the stalk whereas poison ivy has only three. Plus, the peppervine leafs are smaller and less glossy than poison ivy leafs.
This is probably the time to stop and caution against foraging for vines without a basic knowledge of the poisonous vines in your area. In Texas, we have poison ivy, poison oak, and poison sumac. I’m terribly allergic to poison ivy, so I am always on the lookout for it. But it’s important to read up on the characteristics of each plant so you can identify it and avoid it. Be particularly cautious in the fall and winter when the vines no longer have leaves but still cause allergic reactions.
Selecting your vines
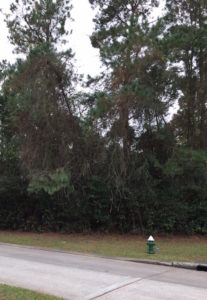
With my basic vine knowledge in mind, I grabbed the kids and the wagon, walked about 100 feet down the road from our house and yanked some vines off of the nearest tree. Several of the vines had recently been cut by the landscaping crew that maintains rights of way along our local roads, so they were just dangling in the tree.

A few vine selection notes:
- Wear gloves – The vines are rough and will tear up your hands if you have to work at dislodging them from the tree. It’s also a good precaution in case you encounter poisonous vines like poison ivy.
- Wear long pants and sleeves – If you are looking for vines out in the woods, this is especially important. You don’t want poison ivy on your legs. Plus, there are a lot of brambly vines out there that will scratch your arms and legs as you search for vines. I wore shorts because I was walking along a maintained path and didn’t need to step off of the concrete pathway to get my vines.
- Watch out for falling debris (and wear eye protection) – When you pull the vines out of the tree, a lot of other debris will fall down with them. Pine needles, pine cones, etc. Don’t look up without eye protection, and move out from under the tree.
- Select vines that are still green or recently cut – The vines that are still green are more pliable and easier to bend around the tree form. You will know if the vines are green versus dead because the dead vines will snap when you try to bend them.
- Don’t feel bad about removing the vines – These are native species, but they are bad for the trees. Believe me, you are doing the tree a favor by removing the vines.
Now to the fun part. How to make the grapevine Christmas tree (or peppervine Christmas tree, in my case):
Tools & Materials
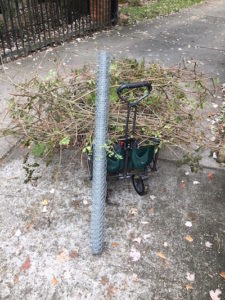
- Freshly cut vines. A LOT. The amount in the photo above was enough to cover one tree and half of another tree. (See my cautionary note above about poison ivy and other poisonous vines to avoid).
- Chicken wire. I had a roll of this
(affiliate link) left over from a previous project. For a 31″ tall tree, cut the chicken wire to 48″ x 24″
- Wire cutters. I couldn’t find our wire cutters, so I used the cutting end of an old pair of wire strippers. Mr. L highly recommends these Knipex brand High Leverage Cutters
(affiliate link). They are a bit pricey, but they are easy to handle and the longer lever arm gives you more power for cutting thicker gauge wire. It’s worth the investment if you cut wire for other projects. But you can use any basic wire cutters to cut chicken wire.
- Thick work gloves. I like these
(affiliate link).
- Christmas lights (optional).
Instructions
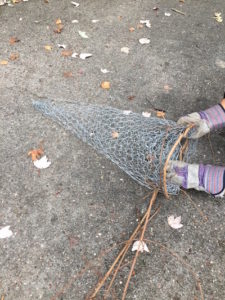
- Form a 31″ cone out of your cut chicken wire. Use the cut wires to hold the chicken wire onto itself. I also found that it helps to pinch the cone at the top at your desired length to keep it from unraveling. (Remove the excess wire above the pinched top with wire cutters).
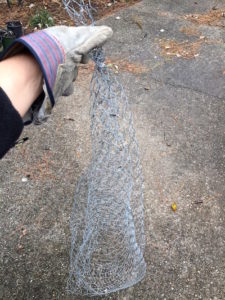 This part is a little tricky because the chicken wire is admittedly difficult to maneuver. But have patience and work with it. You can see that my chicken wire tree form is not pretty. The vines disguise imperfection. If you plan to put your tree in a planter, you’ll want the base of the cone to be narrow enough to fit inside of the planter.
 - Fold any excess chicken wire at the bottom into the the cone. This will help stabilize the base. Use your gloved hand to press out any collapsed areas of the cone from the inside.
- Start adding your vines. I found it worked best to separate out one thicker vine and start working with that. Put the thick end of the vine into a chicken wire hole at the bottom of the cone, and then start wrapping the vine around the cone.
 When you run out of vine, secure it at the top (or however high the vine goes up cone) by either tucking it under itself or sliding it into a hole in the chicken wire.
 - Repeat this process one vine at a time.
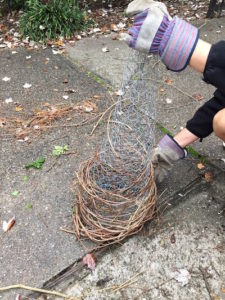 You’ll need to start your next vine higher up the cone as the base gets filled in.
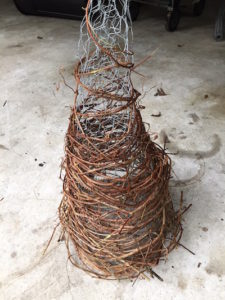
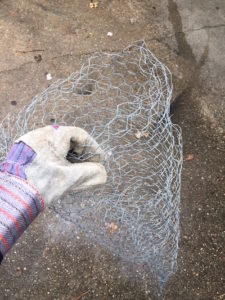
- As you reach the top, I found that small, thinner vines like this work best:
 Start the vine at the middle and wind it up to the top. You can secure it under itself, other vines, or bend some of the cut wire at the point of the cone over the vine.
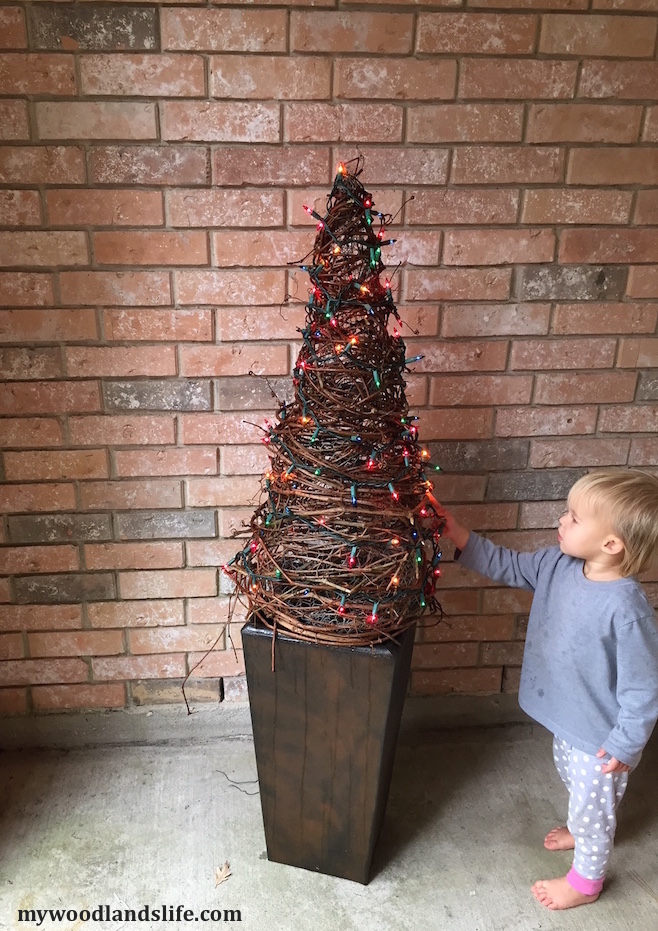
 - After much patience, you should end up with something like this:
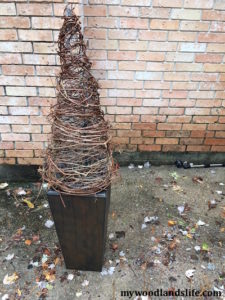
Final touches
I opted to add Christmas lights to my tree, but bows or colored ornaments would also be a cute option. The planter is optional too.
As I mentioned, I only collected enough vines to cover 1.5 trees, so I’m hoping to gather some more once it stops raining outside. On a plus note, though, I’m halfway to my Christmas entryway!

Update: see how the entryway turned out here.


As usual, brilliant idea and execution of this project. LOVE reading your blogs. So entertaining and informative.
Thank you so much!!