My Woodlands Life

  • Home
  • About
  • PROJECTS
  • FOOD
  • FAMILY
  • DECOR
  • GARDEN
  • Contact

Blog PROJECTS

How to digitize old photographs

I may be late jumping on this bandwagon, but I am finally getting around to digitizing my childhood photographs. When Mr. L and I moved into our new house, two things happened: First, we got more space. Second, everyone we knew started taking advantage of our newfound space by delivering boxes of old junk and memorabilia to our house when they came to visit. (To whom it may concern: We still love you, but we are still going to complain ♥). Eventually my upstairs “craft” closet became the holding ground for hundreds and hundreds of old photographs.

How to digitize your photos and not spend a lot of money

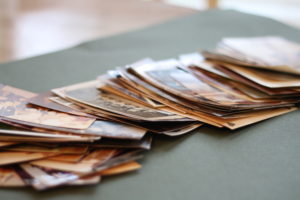
When I could no longer close the door to said craft closet, I decided it was time to tackle the daunting task of digitizing the photographs so that I could throw away the hard copies and free up some space. Around this time, Groupon was offering a promotion on LegacyBox digitizing services. I thought to myself, “Awesome! Let’s see how I can do this.” But then I ran the numbers. With the discount, LegacyBox’s price started at $25 for digitizing 75 photos. That’s great and everything, but I have hundreds and hundreds of photos (maybe over a thousand, but I haven’t finished counting yet). And while my current position as “mom” is extremely fulfilling, the pay is not so good.

The inexpensive way to digitize your old photos

But what I did have was time. I know that sounds funny coming from a mom of two little ones, but the reality is that we moms, like pretty much everyone else these days, all watch a little bit of TV in the evening when the kids are asleep. And, as it turns out, this is the perfect mindless task to do when you’re sitting around. I just needed the equipment.

What You Need

After conferring with my computer-guru uncle and consulting the internet, I learned that all you need is (1) a computer, (2) a semi-decent flatbed scanner, and (3) digital storage space.

How to digitize your photos and save money

A semi-decent flatbed scanner

If you’re scanning in the standard 4×6 or even 8×10 childhood photos, you don’t really need more resolution than 600 dpi. Indeed, I scan the majority of my photos at 300 dpi because (1) they weren’t that high quality to begin with, and (2) I don’t plan on altering them beyond the original scan. This article provides a really good overview of resolution and dpi and things like that in case you want more detailed information from someone who seems to actually have a handle on the technology. I am not that person—I just need to get rid of my boxes of old photographs.

How to digitize old photos

From what I can tell, pretty much any scanner on the market right now can scan at 600 dpi. Indeed, the base model scanner I purchased (see below) can scan up to 4800 dpi. You need a “flatbed” scanner (the kind with the glass panel and cover) so the photos can lie flush against the scanner screen.

If you plan to digitize professional works of art or if you are scanning in something other than photographs (like film, slides, or negatives), then it would be wise to invest in a more expensive scanner or have a professional scan your photos. But for the everyday photograph of the 20th century, inexpensive works just fine.
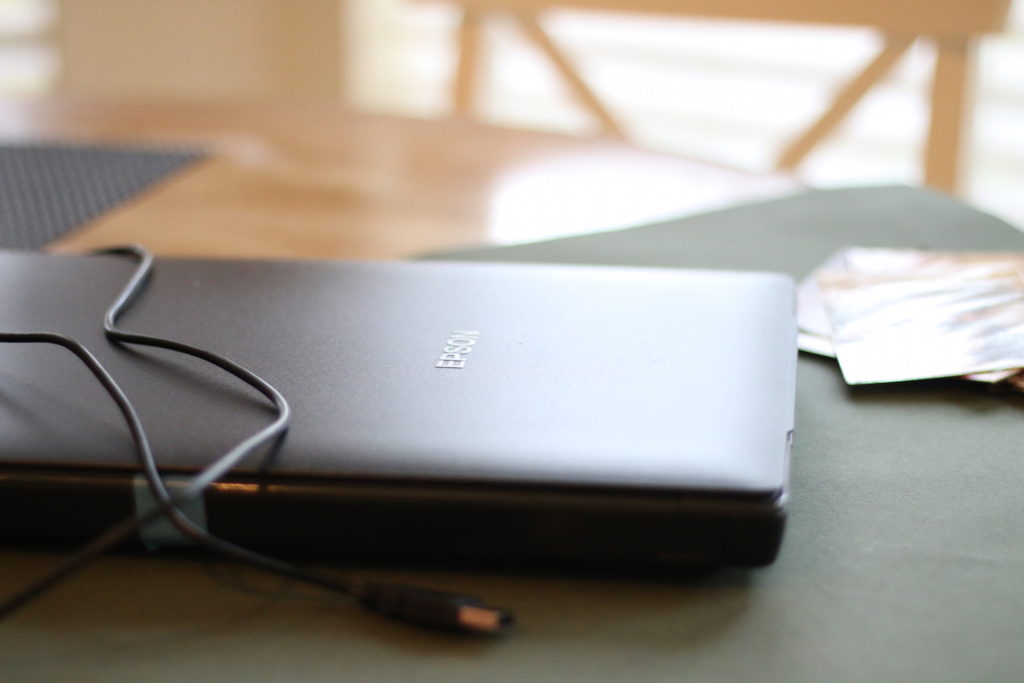
My Scanner

Based on its price and overall favorable reviews, I opted to purchase this Epson Perfection V39 Photo Scanner off of Amazon.

There are a lot of other scanner options out there that I’m sure will do the job just as well, but this was the one I settled on. Overall, I’m very happy with how it has performed. The software is easy to use (see below if you’re interested), and it is low profile.

Visually, the scanner is about the length and width of a legal-sized notepad and the thickness of an old-school laptop. Also, it doesn’t require an independent power source—you just plug it into a USB connection on your computer. And at less than $80, it broke even with LegacyBox on cost after I scanned in 225 photos.

Mine takes about 10 seconds from start to finish on a standard 4×6 photo at 300 dpi. I think more expensive options can scan multiple photos at once. But like I said, I have time, so I’ll stick to my relatively inexpensive one.

Digital Storage Space

If your computer is fairly new, you should be covered on digital storage space. If your laptop is approaching the ten-year mark like my MacBook Air workhorse, then it probably did not come equipped with a terabyte hard drive. The point is, scanning in photos takes up space on your computer so you may want to consider external storage options if you do not have a lot of space.

Mr. L and I have a Dropbox account as well as a Cloud plan with Apple, so I usually upload my photos to one of those spots. I also bought an inexpensive 128GB USB flash drive that stays on my laptop at all times. I’m probably overly paranoid, but when I get rid of hard copies that I cannot replace, I like to keep multiple copies on various storage devices.

Wait a minute!!!

But that’s not all! I, too, had a couple of follow-up questions that I researched to exhaustion. Do keep reading.

What about those apps on your phone that digitize photos?

There are a lot of photoscanning apps out there that are very easy to use and that streamline the scanning process by turning your phone into the scanner. As an example, a lot of people use Google PhotoScan with much success. These are the main reasons I opted to purchase a scanner instead:

  • I wanted higher resolution scans than I would get from my phone. Because I am throwing away the hard copies, I wanted to make sure the copy I am making is as close to the original as possible and can be reproduced to the same quality. Unfortunately, the photoscanning apps can’t achieve the same high-resolution scan as a scanner because they are using your phone’s camera. Additionally, many of the apps automatically compress the image file for storage and sharing purposes.
  • I found the scanning process on the apps to be cumbersome. After trying PhotoScan myself, I found that it takes longer to photograph a photo than to just scan it in on the scanner. I like that my scanner has a dedicated spot in which to place the photo and you just push a button to scan it and save it. (Another bonus is that I can hold the scanner lid shut when The Dot tries to “help” me).
  • I can’t multitask if I have to work on photographing my photo. As I mentioned above, I like that I can scan in photos while watching a TV show or movie. The app requires just enough attention to prevent multitasking.

What do I do with the scanner when I’m done?

Like the fax machine that came before it, scanners are becoming fairly obsolete because you can do so much with your phone. So if you don’t want to have an extra piece of equipment collecting dust after the photo project is over (after all, the whole point of this digitizing project is to reduce the clutter), I highly recommend passing it on to someone else who has photos to digitize. HOWEVER, if you (like me), don’t mind angering the miniature Marie Kondo that sits on your shoulder and chastises you every time you edge a slight bit toward your natural hoarding tendencies (you remember her from this post, right?), the scanner is actually pretty useful for scanning in school artwork and projects and things like that. Then you can throw more things away without feeling guilty.

Use your scanner to scan in kids class projects and artwork

You could also use it as a copying machine. But that’s what phones are for.

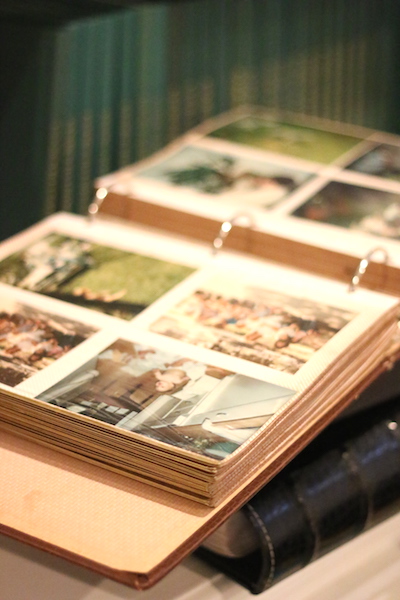
Will anyone ever look at the old photographs after I digitize them?

Despite the fact that I plan to throw mine away, one of the best things about old photographs is that people actually take the time to look at them. I totally get that, and I plan to run with it. My plan is to throw away the old, bulky photographs and photo albums and then make photobooks like these out of the digital files:

How to digitize old photographs

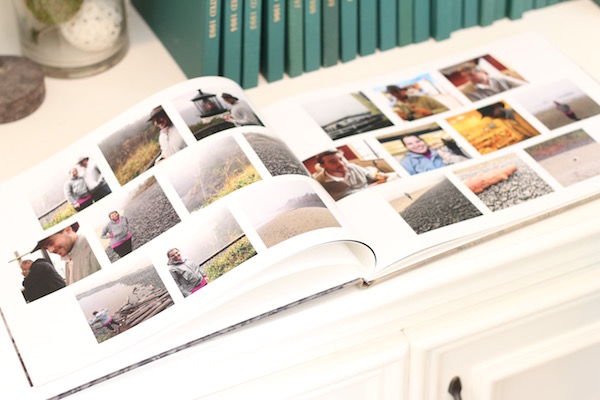
Photobooks are considerably lower profile than traditional photo albums, so I will be able to save space. Plus, I plan to add text and captions to the photographs to actually give them some context.

I’ll do a post on how I make the photobooks later. But for now, know that I am not condemning the old photos to the digital photo wasteland.

How to use the Epson Photo Scanner to Scan in Photos

This is obviously going to be specific to the scanner I purchased, but I wanted to show you how simple the process really is. Feel free to keep on reading if you are interested, but also feel free to stop here. Or just skim to see the photos.

The Epson Scan Software

The software that comes with the scanner is pretty basic. I like that because it’s simple to use and it doesn’t have a lot of excess code written into it to try to “help” you do something that, quite frankly, isn’t rocket science.

Epson scan software for digitizing photos

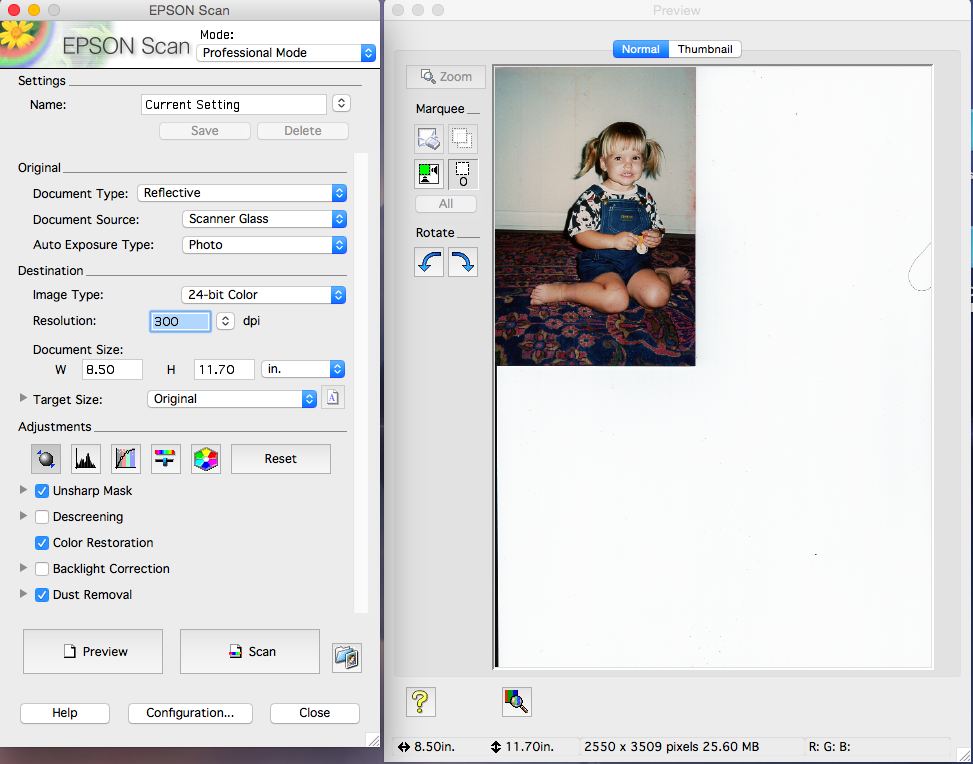
You can see my default settings in the above screenshot. I usually have my scanning resolution set to 300 dpi (or 600 dpi for more important photographs). As discussed below, I like to use the color restoration feature, but I recommend checking and unchecking the various “adjustments” boxes after you’ve done a preview scan to see what each one does.

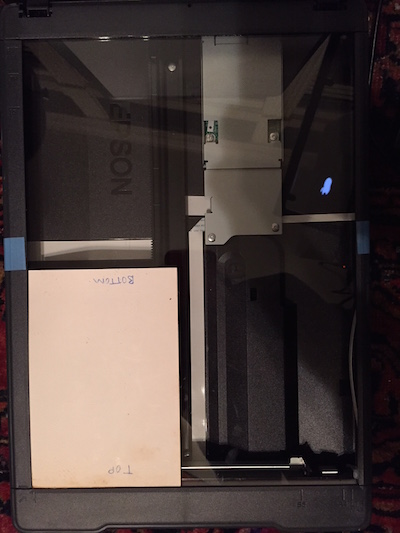
Always do a preview scan for the first photo you’re going to scan in. This will help you set the size and make adjustments that can also apply to the additional photos you want to scan. When you hit “Preview,” the screen on the right pops up:

How to use epson scan scanner software

Your photo may or may not come with pigtails. Simply click and drag your curser over the image to crop it, make any necessary adjustments, and hit “Scan.” This final screen pops up:

How to use epson scan scanner software

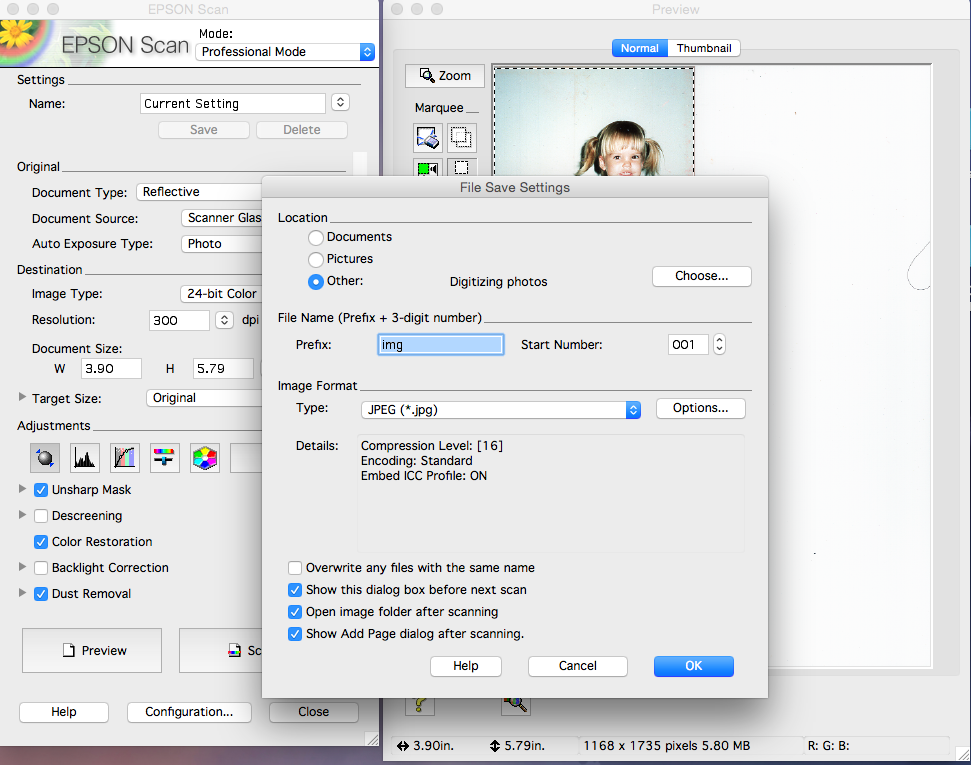
Select “Choose” to determine where you want to save the file, choose your preferred file folder, and then hit “OK” (and “OK” again). Scanning will commence and the rest of the process will be streamlined from here on out. The subsequent photos that you choose to scan will default to these settings. Super easy.

Scanning tips

  • Leave the scanning program open. I must admit that when I originally started scanning in photos, I had a love-hate relationship with the scanner. I liked that it had a button on the scanner itself that would initiate the scans, but the scanning program would reload every time I scanned in a photo. Super annoying. After an hour of idle threats of returning the marred machine, I made an important discovery: Don’t use the button on the scanner. Rather, open the Epson Scan program and scan from there. The program will remain open, and you can just load your next photo.
  • Collate photos of similar size and orientation, then scan. It would also take me a while to crop each photo after I scanned it. Here’s how I work around that issue: gather all of your 4×6 photos and put them in a pile; gather all of your 5×7 photos and put them in a pile. Then separate each pile into (1) the photos that are oriented in landscape orientation (sideways rectangle) and (2) the photos that are oriented in portrait orientation (vertical rectangle). Once you crop and scan in the first photo from its respective pile, you can just load the next similarly-oriented photo and hit “Scan.” It will be cropped to the correct size. No need to waste time previewing.
  • Place photos upside down and facing away in lower left corner. Oh. And big tip—load your photos so they are upside down and facing away from you in the lower left corner. How to use epson scan scanner softwareThis way, the photos will be oriented correctly when you scan them in. Additionally, the scanner won’t have to move as much to scan the image. It will save a lot of time.

Color restoration

One aspect of the scanner that I really like is the color restoration feature. I’m sure there’s a technical reason behind it, but when the color restoration box is checked, something—we’ll say “magic”—happens that makes the photos look less 80s. You know what I mean? Most of my memories of the 1980s have this brown haze about them. This is not only the result of the brown carpeting that my parents had in the house I grew up in, but also because all of our photos from this time have the droopy look. For example, look at this one from my parents’ wedding:

1980 photo before Epson color restoration

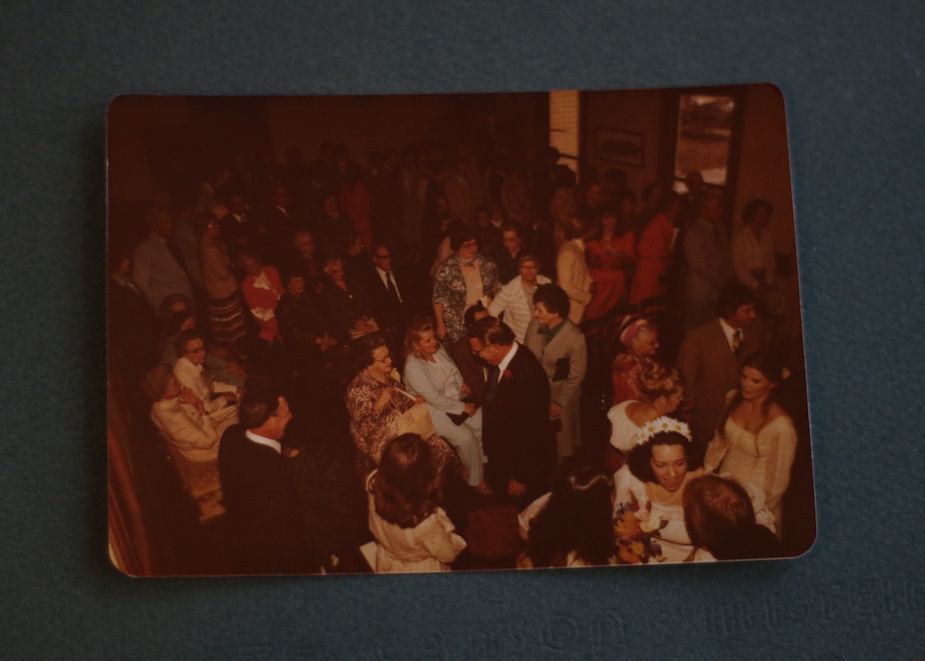
This is what I thought everything looked like back then!!! Are everyone else’s 1980s photos like this? Or is it just my family? Clearly other people have this issue because, you know, the “color restoration” button. Anyway, here’s what it looks like after it is scanned in and the color restored:
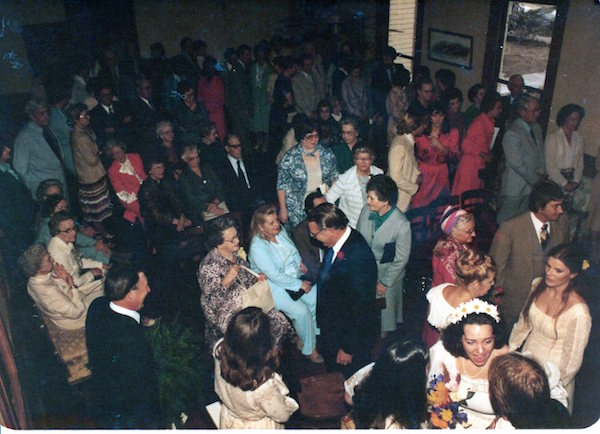
Digitizing old photos

Magic.

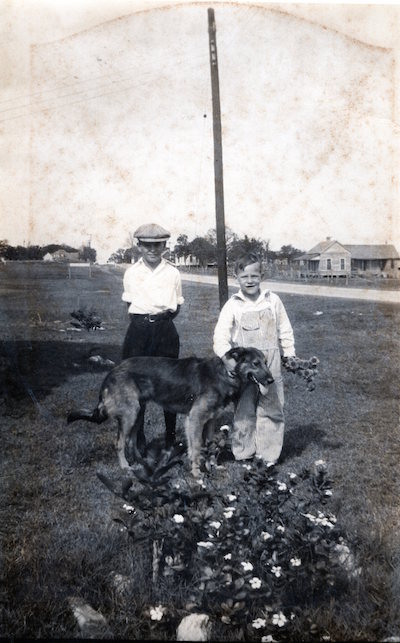
Old photograph of my grandfather, his brother and their dog Nellie:
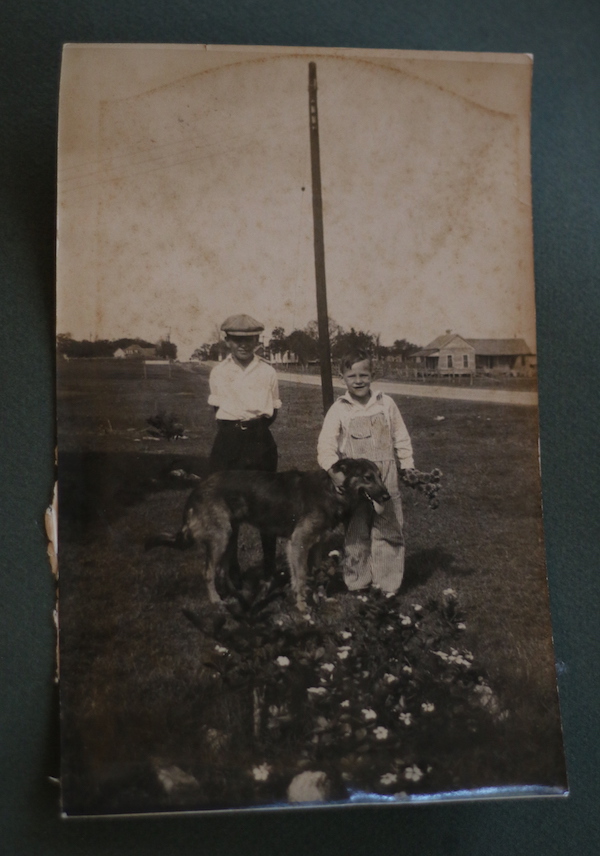
Antique photograph color restoration with scanner

Restored:

Digitizing old photographs

Boom.

Final Thoughts

So far I have scanned in over 800 photos, and the scanner is still going strong. The funny thing is, I thought I was nearing the end of my project when I started writing this. Then I went up to my craft closet to get a photo of the box I stored the albums in, and found a LOT more photos. I guess it’s time to pull out the scanner and watch more Poldark.

The inexpensive way to digitize your own photos


4 Comments

Disclosure:

As an Amazon Associate I earn from qualifying purchases.

Follow me on Social Media

  • Email
  • Facebook
  • Instagram
  • Pinterest

SUBSCRIBE TO MY BLOG VIA EMAIL

* = required field

INSTAGRAM FEED

🌷🐇 Happy Easter!! 🌷🐇 Truth be told, I 🌷🐇 Happy Easter!! 🌷🐇 Truth be told, I didn’t decorate for Easter this year because the house is in shambles and I can’t imagine adding more things to the chaos (new baby and teething toddler are a tricky combination). However, I did manage to put together a small bunnyscape on our kitchen table. Looking forward to Easter brunch with the family tomorrow ❤️🐰

#easterbrunch #easterbreakfast #tablesetting #easter #easterdecor #eastertablescape #eastertable #eastertabledecor #tablescape #tablescapestyling #bunnies #herecomespetercottontail #familytime #springtablescape #springtabledecor #springtable #entertainingathome #neutralstyle #neutraldecor #neutralhome #carrotcake #mywoodlandslifeblog
Happy first day of spring! It’s a doozy here in Happy first day of spring! It’s a doozy here in Texas. Sixty-four degrees and not a cloud in the sky. The kids went to the park, had a “hot dog fire” outside for lunch, and are playing in the backyard this afternoon. I stayed up late last night finishing up a blog post on one of my favorite projects: my Serena and Lily inspired modern coastal coffee table. We took an inexpensive Ikea Lack coffee table and wrapped it in textured vinyl peel and stick wallpaper to get a designer look for less. Check out the link to my blog in my bio for step by step instructions and sources.

#springisintheair #firstdayofspring #blueandwhite #coastaldecor #moderncoastal #mytradhome #ikeahack #ikeahacks #ikealovers #ikeaideas #topiary #coffeetable #coffeetabledecor #coffeetableideas #grasscloth #grassclothwallpaper #removablewallpaper #lightandbright #chinoiserie #chinoiseriechicstyle #blueandwhitedecor #classicdesign #diydecor #diyprojects #mywoodlandslifeblog
Sharing a pop of green from my wallpaper project. Sharing a pop of green from my wallpaper project. Amazingly this was one of the easiest DIY projects I’ve done, and I loved the immediate results. Plus you can’t beat the Amazon price on removable wallpaper. Click the link in my profile for sources. 

#stpatricksday #wallpaper #peelandstickwallpaper #removablewallpaper #myhome #myhomevibe #myhomestyle #mytradhome #greenandwhite #homedecor #diywalldecor #diyprojects #diyhomedecor #wallpaperwednesday #amazonfinds #herringbone #brightasthetic #brightgreen #wallpaperdecor #diy
Follow on Instagram
This error message is only visible to WordPress admins

Error: API requests are being delayed for this account. New posts will not be retrieved.

Log in as an administrator and view the Instagram Feed settings page for more details.

« Our week in five
2018 Holiday Gift Guide: Ages 1-4 »

Comments

  1. Larry says

    November 13, 2018 at 1:51 pm

    Once you scan the photos in, burn them to DVD-R discs for archiving. Use M-discs if you want them to last 1,000 years. (You need an LG DVD burner rated for M-discs.) However, I have discs that are 20 years old and they still work fine. Be sure to catalog the discs so you can actually access your photos when you want to.

    Reply
    • Lauren says

      November 13, 2018 at 8:20 pm

      Great tips! Thanks very much. I hope to eventually get to burning them to DVD. Sooooo many photos to scan in!

      Reply
  2. Joey-Michelle says

    November 14, 2018 at 12:38 pm

    As ALWAYS you are my inspiration!!! LOVE THIS! Especially seeing how the pics come to life and you can actually see the true colors and more content!
    YOUR BIGGEST & FOREVER FAN!!!
    JM

    Reply
    • Lauren says

      November 14, 2018 at 11:48 pm

      Awww! You are so sweet! Thanks for reading.

      Reply

Leave a Reply Cancel reply

Your email address will not be published. Required fields are marked *

Recipe Rating


About me

Hi! I'm Lauren. Welcome to my blog, where I write about DIY projects, home decor, and decorating on a budget. With 3 kids under the age of 5, my house not always as neat in real life as it looks on the blog, but I find a way to embrace (and organize) the chaos.

Follow My Woodlands Life

  • Email
  • Facebook
  • Instagram
  • Pinterest

SUBSCRIBE TO MY BLOG VIA EMAIL

* = required field

INSTAGRAM FEED

🌷🐇 Happy Easter!! 🌷🐇 Truth be told, I 🌷🐇 Happy Easter!! 🌷🐇 Truth be told, I didn’t decorate for Easter this year because the house is in shambles and I can’t imagine adding more things to the chaos (new baby and teething toddler are a tricky combination). However, I did manage to put together a small bunnyscape on our kitchen table. Looking forward to Easter brunch with the family tomorrow ❤️🐰

#easterbrunch #easterbreakfast #tablesetting #easter #easterdecor #eastertablescape #eastertable #eastertabledecor #tablescape #tablescapestyling #bunnies #herecomespetercottontail #familytime #springtablescape #springtabledecor #springtable #entertainingathome #neutralstyle #neutraldecor #neutralhome #carrotcake #mywoodlandslifeblog
Happy first day of spring! It’s a doozy here in Happy first day of spring! It’s a doozy here in Texas. Sixty-four degrees and not a cloud in the sky. The kids went to the park, had a “hot dog fire” outside for lunch, and are playing in the backyard this afternoon. I stayed up late last night finishing up a blog post on one of my favorite projects: my Serena and Lily inspired modern coastal coffee table. We took an inexpensive Ikea Lack coffee table and wrapped it in textured vinyl peel and stick wallpaper to get a designer look for less. Check out the link to my blog in my bio for step by step instructions and sources.

#springisintheair #firstdayofspring #blueandwhite #coastaldecor #moderncoastal #mytradhome #ikeahack #ikeahacks #ikealovers #ikeaideas #topiary #coffeetable #coffeetabledecor #coffeetableideas #grasscloth #grassclothwallpaper #removablewallpaper #lightandbright #chinoiserie #chinoiseriechicstyle #blueandwhitedecor #classicdesign #diydecor #diyprojects #mywoodlandslifeblog
Sharing a pop of green from my wallpaper project. Sharing a pop of green from my wallpaper project. Amazingly this was one of the easiest DIY projects I’ve done, and I loved the immediate results. Plus you can’t beat the Amazon price on removable wallpaper. Click the link in my profile for sources. 

#stpatricksday #wallpaper #peelandstickwallpaper #removablewallpaper #myhome #myhomevibe #myhomestyle #mytradhome #greenandwhite #homedecor #diywalldecor #diyprojects #diyhomedecor #wallpaperwednesday #amazonfinds #herringbone #brightasthetic #brightgreen #wallpaperdecor #diy
So very excited about St. Patrick’s Day tomorrow So very excited about St. Patrick’s Day tomorrow!! We have a well-stocked supply of green food coloring and drinks. Plus I have a lineup of activities for the kiddos that I think they will enjoy. The kids and I made this St. Patrick’s Day themed snack board a few weeks ago as a test run for the blog, and I couldn’t have been happier with how it turned out. Totally tricked the kids into trying cauliflower (they were not fans). But they ate everything else. Cookies first of course 🍀. 

#stpatricksday #stpattysday #stpatrick #snacks #snackideas #snacktime #snacksforkids #healthysnacks #healthysnackideas #fruitandveggies #charcuterieboard #holdthemeat #shamrock #rainbowfood #partyideas #appetizers #foodart #stpatricksdayfood #stpatricksdaydecor #fruittray #veggietray
Playing a bit of catchup on Instagram this week an Playing a bit of catchup on Instagram this week and realized I never shared how my daughter's purple bedroom turned out. While it pained me to paint over her blush flower wall, her love for purple won me over. She is thrilled with the final result and is so excited to have her big girl room just the way she wants it. All the details are on the blog (just click the link under my profile to go check out the post). #purplebedroom #nomorepink #purplebedding #bedroomdecor #purpledecor #popofpurple #catart #homedecorlove #bedroomrefresh #bedroommakeover #bedroomdesign #kidsroomdecor #kidsroominspo #girlsroom #kidsfurniture #toddlerroom #purpleroom #benjaminmoore #lavendarice #mywoodlandslifeblog
When I made this flower arrangement a few weeks ag When I made this flower arrangement a few weeks ago, little did I know that all of the camelias would freeze. I'm thankful to have this winter storm behind us. We lost power for 12 hours and luckily do not have any damage to our pipes. But I know a lot of people who were without power and water for days. Praying for Texas's speedy recovery and so very grateful for all of the linemen and other field personnel who worked tirelessly to restore power.⁣
⁣
#prayfortexas #staysafe #flowerarrangement #flowerpic #blueandwhite #diyhomedecor #entrywaydecor #camelia #pinkandblue #flowerlove #flowerpop #flowersofinstagram #chinoiserie #gingerjar #chinoiseriechic #palmbeachstyle #readyforspring #springinspo #springinthesouth #touchofpink #springflowers #traditionalhome #mywoodlandslifeblog
Now that 2021 has officially begun, I’m starting Now that 2021 has officially begun, I’m starting off the week with fresh linen. Have downsized decorative pillows to three, which makes the husband happy. Drawback to bedding refresh: getting out of cozy bed every morning is a challenge. 

#whitebedding #whitebedroom #neutralbedroomdecor #newyearnewbedding #dontwanttogetup #mypotterybarn #pickstitch #serenaandlily #percaleduvet #diyeurosham #whiteandbright #bedroomrefresh #beddingdecor #beddinginspo #homedecor #brightbedroom #mywoodlandslifeblog
Just finished putting together our mini holiday ho Just finished putting together our mini holiday home tour on the blog and realized that while Christmas is almost here, it is almost over too. I will miss all of the ornaments and reindeer and excuses to eat Christmas cookies. I’m looking forward to spending the next few days with family and especially with the kids. I’m also looking forward to 2021 and am hoping it brings some peace and resolution to this confusing year. I hope too that everyone has a safe and joyful holiday and a Happy New Year. 

#merrychristmas #happyholidays #christmasishere #enjoythemoment #holidayhomedecor #vibrantchristmas #blueandwhite #flocked #christmaslivingroomdecor #mywoodlandslifeblog
What’s for Christmas dinner? I have no idea, but What’s for Christmas dinner? I have no idea, but we will have a cute table setting 😂. I made these pink, green and red charger plates out of $2 plastic chargers from Hobby Lobby and acrylic paint. Check out today’s blog post for more detailed sources/instructions. I’ve also uploaded a step-by-step to my story highlights. 

#christmastablesetting #christmastabledecor #diychargerplates #diycharger #handpaintedchargerplate #christmaschargerplates #pinkandgreenchristmas #worldmarketlinens #holidaycharger #holidaytable #holidaytablesetting #agapanthus #hollyberries #decoratefortheseason #merryandbright #pinkchristmas #mywoodlandslifeblog
I made these little Santa cookies today to go with I made these little Santa cookies today to go with the trees and couldn’t be happier with how they turned out. Packaging them all up with some #traderjoes chocolate covered pretzels to deliver to the neighbors as Christmas goodies. 

Cookie cutters and design inspiration from @hol_fox 
She has the cutest Etsy account with such clever cookie ideas. 

#christmascookies #royalicingdecoratedcookies #santacookies #neighborgiftideas #diyholidaycookies #cutoutcookies #holidaycookies #sugarcookiesfromscratch #hollyfox #christmasgiftidea
A few years ago, I made these piped Christmas pill A few years ago, I made these piped Christmas pillows for our master bed. Well the husband won the pillow battle, and I will humbly admit that having 11 pillows on the bed is a bit much. I think the pillows look cuter on the couch anyway.

#plaidchristmasdecor #plaidpillows #stewarttartanplaid #diypillowcovers  #howmanypillowsistoomany #neutralholidaydecor #redandgreenandwhite #whitecouch #diychristmaspillows #pipedpillows #livingroomdetails #christmasdetails
Tree confession: Not only does our tree have the p Tree confession: Not only does our tree have the party in the front, naked in the back thing going on, it’s also rocking the high water look. The baby (now toddler) keeps absconding with the lower ornaments. Plus our three and five-year-old wanted to show us how tall they are by putting the ornaments as high as they could reach. So we have some nice ornament clumps at arm’s length 😂. Wouldn’t have it any other way though! 

#christmastreedecorating #christmastrees #silverandgoldchristmastree #neutralchristmasdecor #christmaswithtoddlersismagical #treesofinstagram #christmastrees #christmastreedecoration #homedecor #neutralstyle #stockings #boxwoodwreath #mywoodlandslifeblog
Follow on Instagram
This error message is only visible to WordPress admins

Error: API requests are being delayed for this account. New posts will not be retrieved.

Log in as an administrator and view the Instagram Feed settings page for more details.

Recent Posts

How to Make an Om Nom Birthday Cake

How to Make an Om Nom Birthday Cake

Our Coastal Family Room Before and After

Our Coastal Family Room Before and After

Easter Weekend Recap and an Easter Table Setting

Easter Weekend Recap and an Easter Table Setting

Privacy Policy
Cookie Policy

Copyright © 2025 · Divine theme by Restored 316

This website uses cookies to improve your experience. By using this website, we assume you are ok with this, but you can opt-out if you wish.Accept Read More
Privacy & Cookies Policy

Privacy Overview

This website uses cookies to improve your experience while you navigate through the website. Out of these cookies, the cookies that are categorized as necessary are stored on your browser as they are essential for the working of basic functionalities of the website. We also use third-party cookies that help us analyze and understand how you use this website. These cookies will be stored in your browser only with your consent. You also have the option to opt-out of these cookies. But opting out of some of these cookies may have an effect on your browsing experience.
Necessary
Always Enabled

Necessary cookies are absolutely essential for the website to function properly. This category only includes cookies that ensures basic functionalities and security features of the website. These cookies do not store any personal information.

Non-necessary

Any cookies that may not be particularly necessary for the website to function and is used specifically to collect user personal data via analytics, ads, other embedded contents are termed as non-necessary cookies. It is mandatory to procure user consent prior to running these cookies on your website.