My Woodlands Life

  • Home
  • About
  • PROJECTS
  • FOOD
  • FAMILY
  • DECOR
  • GARDEN
  • Contact

Blog DECOR PROJECTS

How to tile over an existing fireplace surround

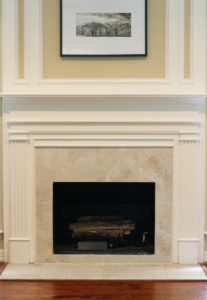
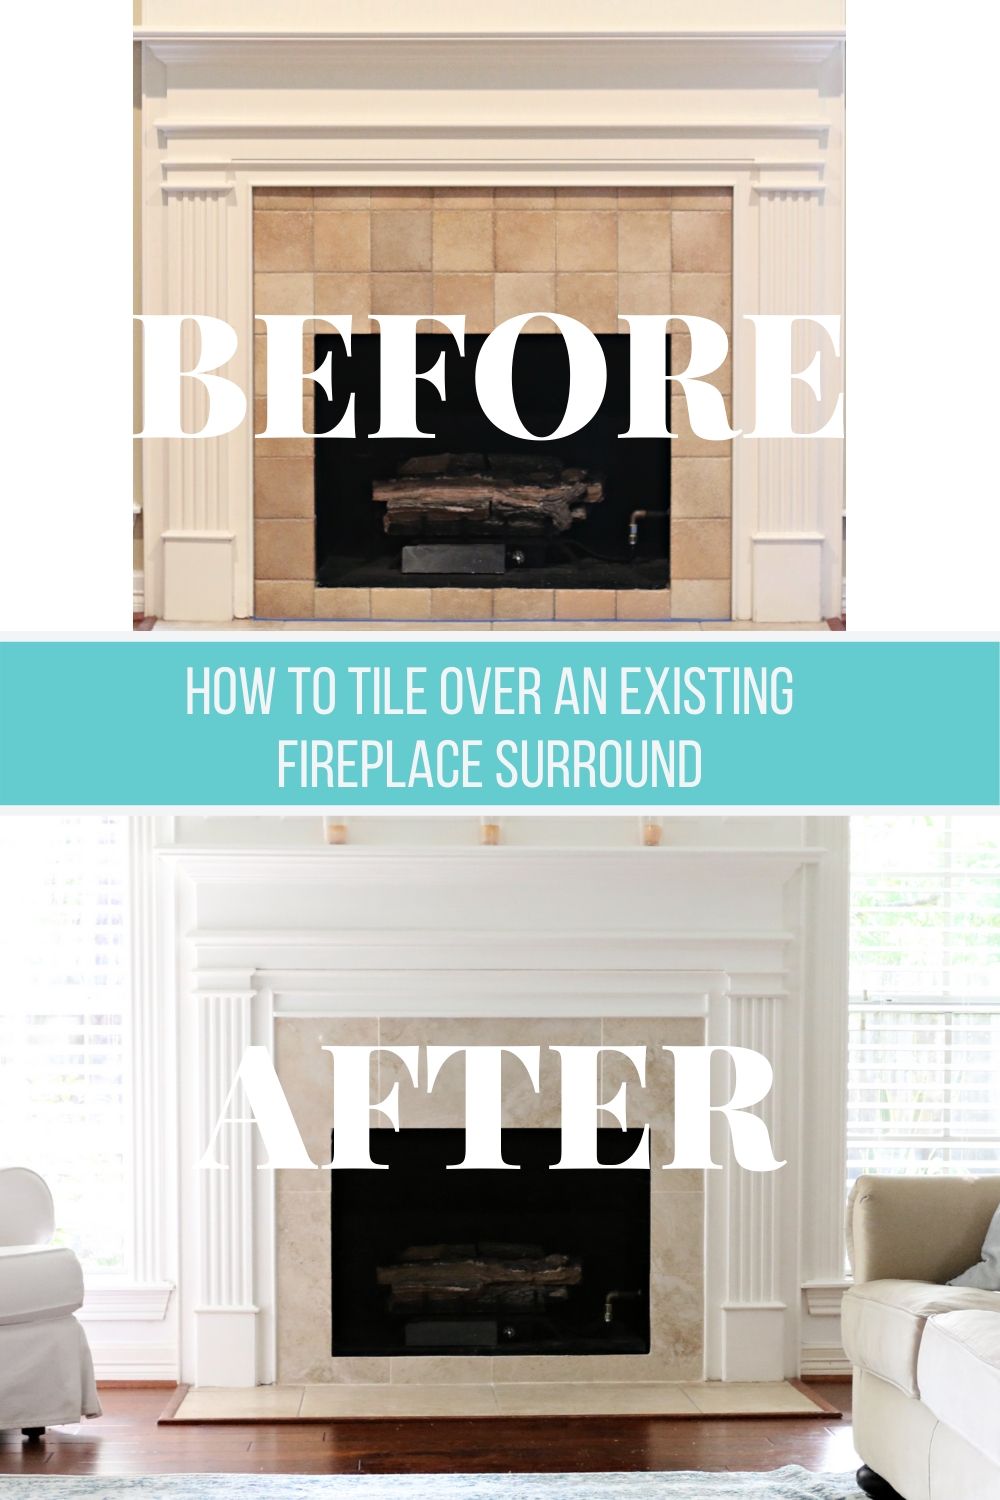
In the four years Mr. L and I have lived in our house, one thing in this house has bothered me more than anything else. Our fireplace. Look closely at this photo:

Fireplace before

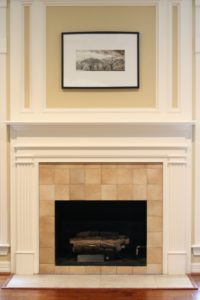
It’s obvious, right? Right???

Ok. Maybe it’s not so obvious. And now might be a good time to segue into the fact that I’m pretty sure everyone to whom I’ve explained my fireplace dilemma thinks I’m crazy. But to the person who spends the majority of her evenings sitting directly across from the fireplace, there is a glaring symmetry issue. I’ve highlighted it in the following photo:

Fireplace tile is not symmetrical

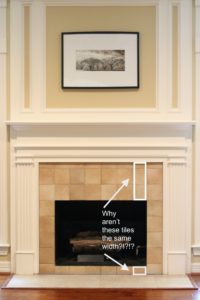
Whoever installed our fireplace surround had a little calculation issue with the tile. One vertical column of tiles is narrower than every other tile on the surround. I can only assume that the installer discovered this issue after he or she made the majority of the cuts and decided to just go with it rather than recut everything. Having completely redone the fireplace surround at this point, I get it. Cutting tile is not fun. But ohmygoodness it drove me crazy.

It was this symmetry issue that led to “Operation Fix-the-fireplace-before-Mr.-L-figures-out-what-you’re-doing-and-tries-to-stop-you.” I will now make my first confession: I knew I could never get Mr. L on board for this project because he (rightly) thought it would be too expensive and difficult to fix. So I undertook this project as sort of stealth-type mission. I researched and bookmarked web pages to try to find the most inexpensive way to remedy my issue. I also made more of an effort to comment on how much I disliked our fireplace so that I could try to bring him to my side and slow-sell my plans. Muahahaha. Ok. I’m really not usually that kind of girl, but the fireplace was awful. Don’t you see the symmetry issue??? I saw it every day.

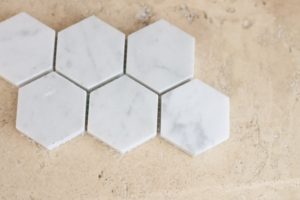
The first glimmer of hope I got was from this post at Young House Love. They did a fireplace surround out of inexpensive marble tiles from the Home Depot, which gave me confidence that I could DIY and get a nice-looking result with minimal expense. Along the marble theme, I also fell in love with Caycee’s hexagonal marble fireplace surround from Hanging with the Hewitts (see it here). It is so gorgeous. I even went and picked up a sample from Daltile, but it didn’t end up working in my space.

Daltile Marble Tile Hexagon Favorite

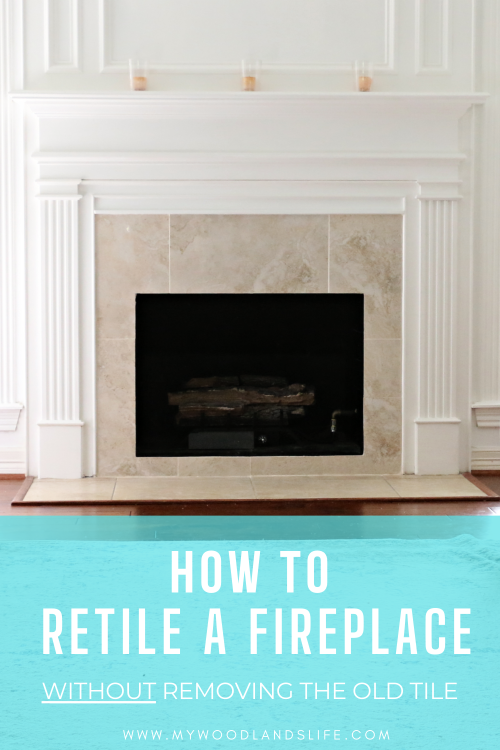
THIS is what I ended up going with:

Tarsus Almond Polished Porcelain Tile

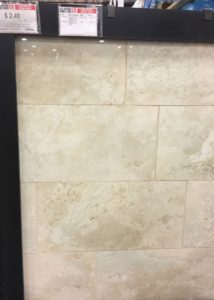
I really did not want to remove the tile on the floor, so my goal was to get a tile that would match the floor tile as closely as possible. Mr. L’s mom is a decorating and color pro, and she and I spent a couple of hours at Floor & Decor choosing out sample tile to bring back home. It was amazing how quickly we nixed samples when we brought them home and laid them next to the fireplace. The Taurus Almond was really the only one that worked. And at $2.49 a square foot, I was sold.

Second confession: I made the HUGE mistake of purchasing tile before I knew what I was doing. In my mind, I imagined myself whipping out the tile saw, cutting the tile and then plopping it over the old tile. Um, yeah. Not so easy. Tiling over preexisting tile (especially on a vertical surface) creates a whole host of problems that I never thought about until I started telling people at the tile place about my plan.

In a perfect world, people put cement backer board behind the area they want to tile. The cement board provides an even surface on which the tile can lay and bonds to the thinset (the latex glue that holds up the tile). The people at YHL put up cement board and made it look so easy. I didn’t even think about the fact that I didn’t have enough space around the fireplace frame to add an extra 1/8 to 1/4 inch of material. And I didn’t want to remove the tile because I had just had a baby and removing tile creates a LOT of noise and dust. Plus it’s hard(er) work.

I tried roughing up the surface of the preexisting tile with some 60 grit sandpaper, but it didn’t make even the slightest scratch in the tile. Our Dremel tool also had no impact whatsoever on the tile. I even considered using Mastic to paste the new tile up, but a tile guy with a lot more experience than me explained that this wouldn’t work for a fireplace because the Mastic would be gooey when subjected to heat.

I had to go out and do more reconnaisance work because, at this point, I had to do something with all of that tile. Eeks. This is when I gained tremendous respect for the folks at the Home Depot. I can’t tell you how many people at other stores told me that my plan wasn’t possible, that I needed to remove all of the old tile, probably the mantle and frame too (which I would then have to rebuild!), and then grind down the thinset and grout.

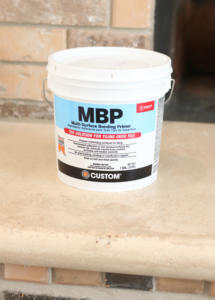
When I was about to give up, Ed from the Home Depot came into my life. He works in the tile section at Home Depot, has over 20+ years of experience laying tile, and adorable grandchildren (he got extra points for playing peek-a-boo with The Dot). He was cool as a cucumber when I told him about my dilemma. “No problem!” he said. And then he told me about MBP–Multisurface Bonding Primer.

MBP is pretty interesting because, according to Ed, it was originally designed to apply over old cutback adhesive residue. Cutback adhesive was commonly used from the 1960s through 1980s to adhere vinyl floor tiles to flooring. The adhesive is difficult to remove and contains asbestos, so it’s also extremely dangerous to remove. MBP can be painted over the old adhesive, and the new tile and adhesive will bond to it. In my case, MBP could be painted over my old tile and would improve its adhesive capabilities so that my new tile could stick to it.

The main drawback to MBP, however, is that it comes in a giant container that costs around $40. I will admit that I reconsidered my Mastic plan several times after seeing the $40 price tag. But, at this point, I knew the fireplace was going to be a lot of work, and I wanted my hard work to last. And after talking with Ed, I knew it was the right thing to do.

MBP Multisurface Bonding Primer

After purchasing the MBP and countless other items that I didn’t realize I would need until (*sigh*) after I bought my tile and committed so much time and energy into research, it was game time.

And . . . at this point I’m not going to go into the detailed steps of what I did. Keep reading, though! Because I will give you all of the information you need to tile over an existing fireplace surround.

It’s just that I do not think that my photo set would be very helpful because, quite honestly (and here’s another confession), almost every time I undertook a different part of the project I was like, “Oh *expletive* oh *expletive* oh *expletive*!” Because holy cow tile work is really hard. And it’s dirty work! I seriously admire anyone who has done this.

WHAT YOU NEED TO KNOW

What I do think would be helpful and what I wish I had found online before I tiled over my existing fireplace surround is a list of all the items you will need to do the job correctly and the considerations you need to take into account before starting any of this. I’m also going to provide you with detailed steps of how we prepared and tiled over the existing surround and links to videos that I found helpful when it came time to put up the tile.

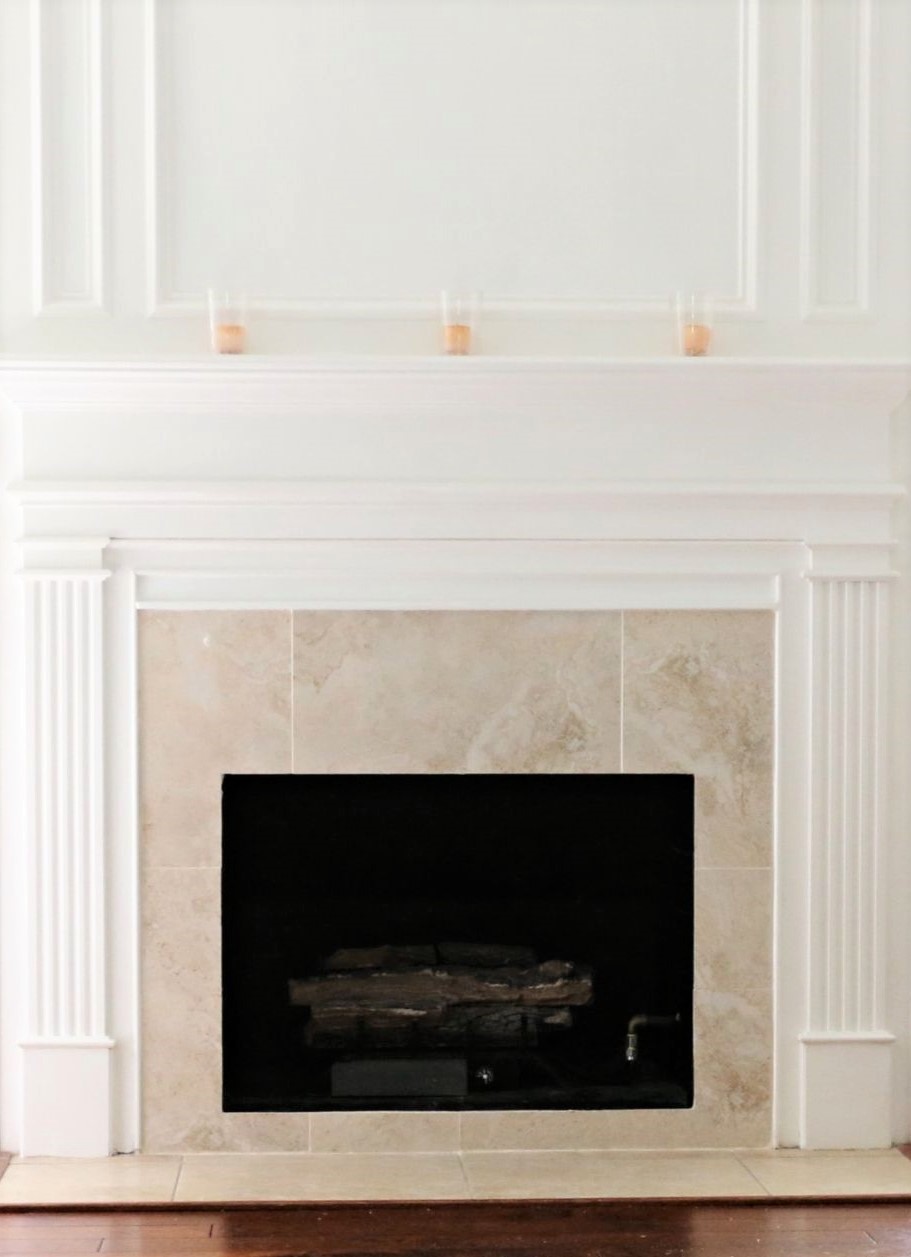
And I will show you how amazing my after picture is:

Fireplace After

Add a fresh coat of paint to the trim, and voila!

Putting tile over an existing fireplace surround is not as easy as you might think. I used MBP to guarantee the new thinset would bond to the existing tile. Read more at www.mywoodlandslife.com

Tools and cost breakdown:

Total cost: $191

  • Tile work

    • Wet tile saw: we borrowed this one from my Uncle
    • Tile saw diamond blade: $11
    • Tile: $60 (I purchased 12 of these 12in x 24in tiles from Floor & Decor)
  • Fireplace surface prep

    • TSP Trisodium phosphate heavy duty cleaner: $4
    • Rubber gloves: already owned
    • Safety goggles: already owned
    • Long sleeve shirt: already owned
    • Bucket for TSP solution: already owned
    • Bucket for water: already owned
    • Rag for TSP: already owned
    • Rag for water: already owned
    • MBP Multispurafce Bonding Primer: $42
    • Mixer or drill: already owned drill
    • Thinset and grout mixing paddle: $13 (We bought this one and used it with our drill)
    • 1/4″ or 3/8″ nap paint roller: already owned
    • Paper plates: already owned
  • Tile adhesion

    • Quickset mortar: $27 (I used ProLite White Tile & Stone Mortar because I had large-format tiles)
    • Mixer or drill: already owned drill
    • Thinset and grout mixing paddle: see above
    • Notched trowel: $8 (I used this one because of my large-format tile size)
    • Spacers: $3 (I used these 1/16th inch hard plastic tile spacers)
    • Bucket: already owned
    • 2×4 pieces for support: already owned
    • Rubber mallet: already owned
    • TONS of paper towels: already owned
  • Grout

    • Grout: $11 (I used Mapei 49 Light Almond Keracolor Sanded Grout, which is the grout the store recommended for the tile I selected)
    • Float: $10 (I used this one, but didn’t really care for it)
    • Sponge: $2 (I used this one)
    • Two buckets for water: already owned
    • TONS of paper towels: already owned

Considerations:

  • The most important thing to consider before starting this project is how much time and money are you willing to spend. My total materials cost was $200, but that $200 is just a tiny representation of the sweat, frustration, and goo (seriously–thinset and grout was EVERYWHERE) that went into the actual project. I have sworn off working with tile again. It was the most un-fun DIY project ever. If you do not like messes, consider hiring a professional to do the tile. Or at least have someone who has worked with tile nearby.
  • Before you start this project, really examine the space you have to work with. Specifically, look at the wood trim around the tile surround and make sure there is enough space to add extra tile. Remember that the thinset will add a little bit of extra depth too.
  • Look at the hearth of the fireplace (in my case, the tile on the ground). You’ll want your new tile to complement the hearth material. At the tile store, grab as many samples as possible because tile that looks amazing in the store may not work in your space. I still pine over the hexagon marble tie, but it looked so strange in my living room.
  • One thing I wish I had considered before I bought my tile was the limitation of the tile saw I borrowed. I had 12in x 24in tile, but a whole piece of tile wouldn’t actually fit in the tile cutter. I had to cut each piece down to around 20 inches and work with that length, and it ended up being a lot more work. The final product would have been even better if I could have kept some of the tiles whole. You can rent tile saws from home improvement stores, but I was trying to keep costs down.
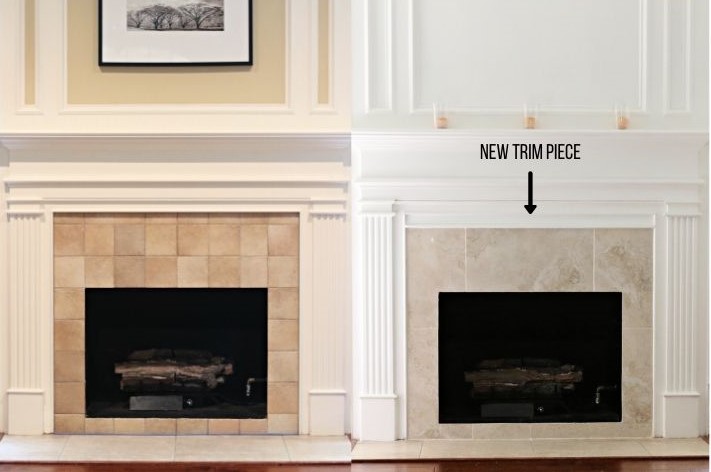
  • You can save a little bit more money by adding extra trim on top of the existing surround. I cut down a 1/4in, 2×4 MDF panel for the piece that lies flush with the tile. The narrower trim piece underneath that is 1/2in x 3/4in moulding from the Home Depot.

Putting tile over an existing fireplace surround is not as easy as you might think. I used MBP to guarantee the new thinset would bond to the existing tile. Read more at www.mywoodlandslife.com

Helpful links and tips:

  • Tile work

    • I recommend sketching out a diagram of your fireplace on SketchUp, Powerpoint, or even by hand (just use centimeters on a ruler in place of feet for a rough sketch) to figure out a design that you like and to help with measurements.
    • When you have a general design idea, lay the uncut tile on the ground to visualize the fireplace surround shape. Because my tile was manufactured porcelain, there were several identical tiles that I did not want side by side. You’ll want to see your actual tile pieces in place so you can choose the pieces you like best.
    • Oh. And be very careful with the tile you purchased. I left mine in the back of my car for a week and several pieces had chipped corners by the time I moved them into the garage.
    • Buy extra tile in case you make a mistake–YOU WILL MAKE A MISTAKE, so you need this.
    • Measure, measure, measure, and measure again. Otherwise, you will end up with the fireplace that started this whole mess.
    • Each time you cut a piece of tile, take it over to fireplace and hold it up to make sure it fits. Then take that piece and hold it up to the previous piece you cut to make sure it is the same width/length (whichever is applicable).
    • When you’re done cutting all of your tile, lay it all out on the ground again to make sure you like the design and that the measurements are correct.
  • Fireplace surface prep

    • You seriously have to wear all of the protective items because first, TSP is a poisonous chemical and second, MBP does NOT come off once it dries. I can’t even imagine what that stuff can do to your eyes.
    • Read the instructions on the TSP box to mix it with water in a bucket and then wipe down the preexisting tile with the diluted TSP solution to get it as clean as possible. Then use a rag and a bucket of water to wash off the TSP.
    • Follow the instructions on the MBP container, except DO NOT use a paint brush to apply the MBP–use a roller. The roller will give you a more even coat. Watch this video to get an idea of how thin to apply the MBP. As an example, I only applied one coat and could still see the color variation of the old tile underneath. I checked with MBP’s customer service (which is awesome, by the way) about whether I should apply a second coat, and they told me it was fine as is. A thin even coat is ideal. I poured a small amount of the MBP on a paper plate and used that as roller tray to save some money.
  • Tile adhesion

    • Watch this video to get an idea about how to mix the thinset and how to apply it to a vertical surface.
    • Mr. L made a support out of three 2×4 pieces–a longer horizontal piece and two vertical pieces. We wedged the support in place by hitting the vertical pieces with a rubber mallet. I’m truly sorry I don’t have a picture of how we set this up. The support basically (for lack of a better word) supported the tile at the top of the surround. If it wasn’t there, the tile would have slouched down because of its heavy weight (or maybe I didn’t apply the thinset correctly–no idea! But I needed that support!)
    • This part was incredibly difficult for me, and I made a giant mess. Thinset was everywhere. All over the carpet and all over the wood floors. Paper towels are key here for fast cleanup.
  • Grout

    • Watch this video to see how to mix and apply the grout.
    • I found the two-bucket method discussed in the video to be incredibly helpful with keeping the sponge clean.
    • In my case, grout went everywhere, just like the mortar. So yeah. Paper towels.

If you look up really close, my new and improved fireplace surround is far from perfect. There are some tiles that stick out farther than others (because the original tiles were not even). The grout is technically a lighter color than the grout on the floor. And those two smaller pieces in the middle were a complete flub on my part because I should have just used whole tile pieces but my tile cutter wouldn’t cut 24 inch pieces.

Putting tile over an existing fireplace surround is not as easy as you might think. I used MBP to guarantee the new thinset would bond to the existing tile. Read more at www.mywoodlandslife.com

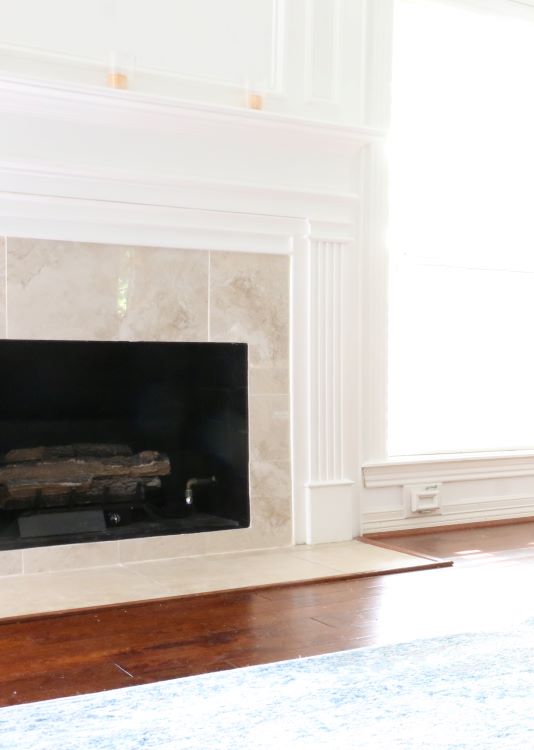
But it’s sooooooo much better than what was there before. And that’s what matters to me. The new paint job doesn’t hurt either.

Feel free to pin the images below if you’d like to reference back to this post at a later date. Thanks for checking out my blog!

Putting tile over an existing fireplace surround is not as easy as you might think. I used MBP to guarantee the new thinset would bond to the existing tile. Read more at www.mywoodlandslife.com

Putting tile over an existing fireplace surround is not as easy as you might think. I used MBP to guarantee the new thinset would bond to the existing tile. Read more at www.mywoodlandslife.com


Leave a Comment

Related Posts

  • A Modern Traditional Entryway Update
  • Front Door Refresh
  • How to organize your pantry before and after
    How I simplified my life by organizing my kitchen pantry

Disclosure:

As an Amazon Associate I earn from qualifying purchases.

Follow me on Social Media

  • Email
  • Facebook
  • Instagram
  • Pinterest

SUBSCRIBE TO MY BLOG VIA EMAIL

* = required field

INSTAGRAM FEED

🌷🐇 Happy Easter!! 🌷🐇 Truth be told, I 🌷🐇 Happy Easter!! 🌷🐇 Truth be told, I didn’t decorate for Easter this year because the house is in shambles and I can’t imagine adding more things to the chaos (new baby and teething toddler are a tricky combination). However, I did manage to put together a small bunnyscape on our kitchen table. Looking forward to Easter brunch with the family tomorrow ❤️🐰

#easterbrunch #easterbreakfast #tablesetting #easter #easterdecor #eastertablescape #eastertable #eastertabledecor #tablescape #tablescapestyling #bunnies #herecomespetercottontail #familytime #springtablescape #springtabledecor #springtable #entertainingathome #neutralstyle #neutraldecor #neutralhome #carrotcake #mywoodlandslifeblog
Happy first day of spring! It’s a doozy here in Happy first day of spring! It’s a doozy here in Texas. Sixty-four degrees and not a cloud in the sky. The kids went to the park, had a “hot dog fire” outside for lunch, and are playing in the backyard this afternoon. I stayed up late last night finishing up a blog post on one of my favorite projects: my Serena and Lily inspired modern coastal coffee table. We took an inexpensive Ikea Lack coffee table and wrapped it in textured vinyl peel and stick wallpaper to get a designer look for less. Check out the link to my blog in my bio for step by step instructions and sources.

#springisintheair #firstdayofspring #blueandwhite #coastaldecor #moderncoastal #mytradhome #ikeahack #ikeahacks #ikealovers #ikeaideas #topiary #coffeetable #coffeetabledecor #coffeetableideas #grasscloth #grassclothwallpaper #removablewallpaper #lightandbright #chinoiserie #chinoiseriechicstyle #blueandwhitedecor #classicdesign #diydecor #diyprojects #mywoodlandslifeblog
Sharing a pop of green from my wallpaper project. Sharing a pop of green from my wallpaper project. Amazingly this was one of the easiest DIY projects I’ve done, and I loved the immediate results. Plus you can’t beat the Amazon price on removable wallpaper. Click the link in my profile for sources. 

#stpatricksday #wallpaper #peelandstickwallpaper #removablewallpaper #myhome #myhomevibe #myhomestyle #mytradhome #greenandwhite #homedecor #diywalldecor #diyprojects #diyhomedecor #wallpaperwednesday #amazonfinds #herringbone #brightasthetic #brightgreen #wallpaperdecor #diy
Follow on Instagram
This error message is only visible to WordPress admins

Error: API requests are being delayed for this account. New posts will not be retrieved.

Log in as an administrator and view the Instagram Feed settings page for more details.

« Flags and flowers for July 4th
Our week in five »

Leave a Reply Cancel reply

Your email address will not be published. Required fields are marked *

Recipe Rating


About me

Hi! I'm Lauren. Welcome to my blog, where I write about DIY projects, home decor, and decorating on a budget. With 3 kids under the age of 5, my house not always as neat in real life as it looks on the blog, but I find a way to embrace (and organize) the chaos.

Follow My Woodlands Life

  • Email
  • Facebook
  • Instagram
  • Pinterest

SUBSCRIBE TO MY BLOG VIA EMAIL

* = required field

INSTAGRAM FEED

🌷🐇 Happy Easter!! 🌷🐇 Truth be told, I 🌷🐇 Happy Easter!! 🌷🐇 Truth be told, I didn’t decorate for Easter this year because the house is in shambles and I can’t imagine adding more things to the chaos (new baby and teething toddler are a tricky combination). However, I did manage to put together a small bunnyscape on our kitchen table. Looking forward to Easter brunch with the family tomorrow ❤️🐰

#easterbrunch #easterbreakfast #tablesetting #easter #easterdecor #eastertablescape #eastertable #eastertabledecor #tablescape #tablescapestyling #bunnies #herecomespetercottontail #familytime #springtablescape #springtabledecor #springtable #entertainingathome #neutralstyle #neutraldecor #neutralhome #carrotcake #mywoodlandslifeblog
Happy first day of spring! It’s a doozy here in Happy first day of spring! It’s a doozy here in Texas. Sixty-four degrees and not a cloud in the sky. The kids went to the park, had a “hot dog fire” outside for lunch, and are playing in the backyard this afternoon. I stayed up late last night finishing up a blog post on one of my favorite projects: my Serena and Lily inspired modern coastal coffee table. We took an inexpensive Ikea Lack coffee table and wrapped it in textured vinyl peel and stick wallpaper to get a designer look for less. Check out the link to my blog in my bio for step by step instructions and sources.

#springisintheair #firstdayofspring #blueandwhite #coastaldecor #moderncoastal #mytradhome #ikeahack #ikeahacks #ikealovers #ikeaideas #topiary #coffeetable #coffeetabledecor #coffeetableideas #grasscloth #grassclothwallpaper #removablewallpaper #lightandbright #chinoiserie #chinoiseriechicstyle #blueandwhitedecor #classicdesign #diydecor #diyprojects #mywoodlandslifeblog
Sharing a pop of green from my wallpaper project. Sharing a pop of green from my wallpaper project. Amazingly this was one of the easiest DIY projects I’ve done, and I loved the immediate results. Plus you can’t beat the Amazon price on removable wallpaper. Click the link in my profile for sources. 

#stpatricksday #wallpaper #peelandstickwallpaper #removablewallpaper #myhome #myhomevibe #myhomestyle #mytradhome #greenandwhite #homedecor #diywalldecor #diyprojects #diyhomedecor #wallpaperwednesday #amazonfinds #herringbone #brightasthetic #brightgreen #wallpaperdecor #diy
So very excited about St. Patrick’s Day tomorrow So very excited about St. Patrick’s Day tomorrow!! We have a well-stocked supply of green food coloring and drinks. Plus I have a lineup of activities for the kiddos that I think they will enjoy. The kids and I made this St. Patrick’s Day themed snack board a few weeks ago as a test run for the blog, and I couldn’t have been happier with how it turned out. Totally tricked the kids into trying cauliflower (they were not fans). But they ate everything else. Cookies first of course 🍀. 

#stpatricksday #stpattysday #stpatrick #snacks #snackideas #snacktime #snacksforkids #healthysnacks #healthysnackideas #fruitandveggies #charcuterieboard #holdthemeat #shamrock #rainbowfood #partyideas #appetizers #foodart #stpatricksdayfood #stpatricksdaydecor #fruittray #veggietray
Playing a bit of catchup on Instagram this week an Playing a bit of catchup on Instagram this week and realized I never shared how my daughter's purple bedroom turned out. While it pained me to paint over her blush flower wall, her love for purple won me over. She is thrilled with the final result and is so excited to have her big girl room just the way she wants it. All the details are on the blog (just click the link under my profile to go check out the post). #purplebedroom #nomorepink #purplebedding #bedroomdecor #purpledecor #popofpurple #catart #homedecorlove #bedroomrefresh #bedroommakeover #bedroomdesign #kidsroomdecor #kidsroominspo #girlsroom #kidsfurniture #toddlerroom #purpleroom #benjaminmoore #lavendarice #mywoodlandslifeblog
When I made this flower arrangement a few weeks ag When I made this flower arrangement a few weeks ago, little did I know that all of the camelias would freeze. I'm thankful to have this winter storm behind us. We lost power for 12 hours and luckily do not have any damage to our pipes. But I know a lot of people who were without power and water for days. Praying for Texas's speedy recovery and so very grateful for all of the linemen and other field personnel who worked tirelessly to restore power.⁣
⁣
#prayfortexas #staysafe #flowerarrangement #flowerpic #blueandwhite #diyhomedecor #entrywaydecor #camelia #pinkandblue #flowerlove #flowerpop #flowersofinstagram #chinoiserie #gingerjar #chinoiseriechic #palmbeachstyle #readyforspring #springinspo #springinthesouth #touchofpink #springflowers #traditionalhome #mywoodlandslifeblog
Now that 2021 has officially begun, I’m starting Now that 2021 has officially begun, I’m starting off the week with fresh linen. Have downsized decorative pillows to three, which makes the husband happy. Drawback to bedding refresh: getting out of cozy bed every morning is a challenge. 

#whitebedding #whitebedroom #neutralbedroomdecor #newyearnewbedding #dontwanttogetup #mypotterybarn #pickstitch #serenaandlily #percaleduvet #diyeurosham #whiteandbright #bedroomrefresh #beddingdecor #beddinginspo #homedecor #brightbedroom #mywoodlandslifeblog
Just finished putting together our mini holiday ho Just finished putting together our mini holiday home tour on the blog and realized that while Christmas is almost here, it is almost over too. I will miss all of the ornaments and reindeer and excuses to eat Christmas cookies. I’m looking forward to spending the next few days with family and especially with the kids. I’m also looking forward to 2021 and am hoping it brings some peace and resolution to this confusing year. I hope too that everyone has a safe and joyful holiday and a Happy New Year. 

#merrychristmas #happyholidays #christmasishere #enjoythemoment #holidayhomedecor #vibrantchristmas #blueandwhite #flocked #christmaslivingroomdecor #mywoodlandslifeblog
What’s for Christmas dinner? I have no idea, but What’s for Christmas dinner? I have no idea, but we will have a cute table setting 😂. I made these pink, green and red charger plates out of $2 plastic chargers from Hobby Lobby and acrylic paint. Check out today’s blog post for more detailed sources/instructions. I’ve also uploaded a step-by-step to my story highlights. 

#christmastablesetting #christmastabledecor #diychargerplates #diycharger #handpaintedchargerplate #christmaschargerplates #pinkandgreenchristmas #worldmarketlinens #holidaycharger #holidaytable #holidaytablesetting #agapanthus #hollyberries #decoratefortheseason #merryandbright #pinkchristmas #mywoodlandslifeblog
I made these little Santa cookies today to go with I made these little Santa cookies today to go with the trees and couldn’t be happier with how they turned out. Packaging them all up with some #traderjoes chocolate covered pretzels to deliver to the neighbors as Christmas goodies. 

Cookie cutters and design inspiration from @hol_fox 
She has the cutest Etsy account with such clever cookie ideas. 

#christmascookies #royalicingdecoratedcookies #santacookies #neighborgiftideas #diyholidaycookies #cutoutcookies #holidaycookies #sugarcookiesfromscratch #hollyfox #christmasgiftidea
A few years ago, I made these piped Christmas pill A few years ago, I made these piped Christmas pillows for our master bed. Well the husband won the pillow battle, and I will humbly admit that having 11 pillows on the bed is a bit much. I think the pillows look cuter on the couch anyway.

#plaidchristmasdecor #plaidpillows #stewarttartanplaid #diypillowcovers  #howmanypillowsistoomany #neutralholidaydecor #redandgreenandwhite #whitecouch #diychristmaspillows #pipedpillows #livingroomdetails #christmasdetails
Tree confession: Not only does our tree have the p Tree confession: Not only does our tree have the party in the front, naked in the back thing going on, it’s also rocking the high water look. The baby (now toddler) keeps absconding with the lower ornaments. Plus our three and five-year-old wanted to show us how tall they are by putting the ornaments as high as they could reach. So we have some nice ornament clumps at arm’s length 😂. Wouldn’t have it any other way though! 

#christmastreedecorating #christmastrees #silverandgoldchristmastree #neutralchristmasdecor #christmaswithtoddlersismagical #treesofinstagram #christmastrees #christmastreedecoration #homedecor #neutralstyle #stockings #boxwoodwreath #mywoodlandslifeblog
Follow on Instagram
This error message is only visible to WordPress admins

Error: API requests are being delayed for this account. New posts will not be retrieved.

Log in as an administrator and view the Instagram Feed settings page for more details.

Recent Posts

How to Make an Om Nom Birthday Cake

How to Make an Om Nom Birthday Cake

Our Coastal Family Room Before and After

Our Coastal Family Room Before and After

Easter Weekend Recap and an Easter Table Setting

Easter Weekend Recap and an Easter Table Setting

Privacy Policy
Cookie Policy

Copyright © 2025 · Divine theme by Restored 316

This website uses cookies to improve your experience. By using this website, we assume you are ok with this, but you can opt-out if you wish.Accept Read More
Privacy & Cookies Policy

Privacy Overview

This website uses cookies to improve your experience while you navigate through the website. Out of these cookies, the cookies that are categorized as necessary are stored on your browser as they are essential for the working of basic functionalities of the website. We also use third-party cookies that help us analyze and understand how you use this website. These cookies will be stored in your browser only with your consent. You also have the option to opt-out of these cookies. But opting out of some of these cookies may have an effect on your browsing experience.
Necessary
Always Enabled

Necessary cookies are absolutely essential for the website to function properly. This category only includes cookies that ensures basic functionalities and security features of the website. These cookies do not store any personal information.

Non-necessary

Any cookies that may not be particularly necessary for the website to function and is used specifically to collect user personal data via analytics, ads, other embedded contents are termed as non-necessary cookies. It is mandatory to procure user consent prior to running these cookies on your website.